Item Fulfillment
Items > Item Fulfillment
Item Fulfillments are done to record items sent from one warehouse to another. Item fulfillments are created manually or created automatically when Ordering Guides or Warehouse Transfers are created and approved (if approval is required via the building or item). Item Fulfillments are also automatically generated upon posting a sales order.
Item Fulfillment Screen

-
Search - search by item fulfillment identifier
-
Open - filter by status (All Statuses, Closed, Completed, Error, Open (default), Shipping)
-
All Receiving Warehouses - filter by the warehouse that will be receiving the transfer
-
Reset - click to reset search parameters
-
New Item Fulfillment - click to add a new fulfillment manually
-
Expected Date - choose the anticipated date of delivery
-
Fulfillment Warehouse - choose the warehouse that is sending the product. Note: If the user's security role is limited to one building, that building will be selected automatically.
-
Receiving Warehouse - choose the warehouse to which the product is being sent
-
Delivery Address - choose the Receiving Warehouse's delivery address if more than one is available
-
Shopping List - choose a Shopping List to pre-populate the fulfillment with the items on the list
-
Item Tags - choose item tag(s) to pre-populate the fulfillment with items respectively tagged
-
Cancel - click to return to the previous screen without creating a new fulfillment
-
Save - click to be redirected to the individual item fulfillment screen
-
Advanced - click to open advanced search parameters
-
All Fulfillment Warehouses - filter by the warehouse that will be fulfilling the transfer
-
Expected Date - select the date range the transfer is expected to be delivered
-
Fulfillment Date - select the date range the transfer is expected to be fulfilled
-
Inventory Route - filter by inventory route(s)
-
Items - filter for fulfillments that include certain inventory items
-
Search - click to apply advanced filters
-
Identifier - click to sort by fulfillment identifier
-
Expected Date - click to sort by expected date of delivery
Created Date (not pictured) - click to sort by the date the fulfillment was created -
Fulfillment Warehouse - click to sort by fulfillment warehouse
-
Receiving Warehouse - click to sort by receiving warehouse
-
Status - click to sort by status
-
Pencil - click to be redirected to the individual fulfillment screen
-
Calendar Icon - hover to see date, status, and person details
-
< > - click to scroll through pages
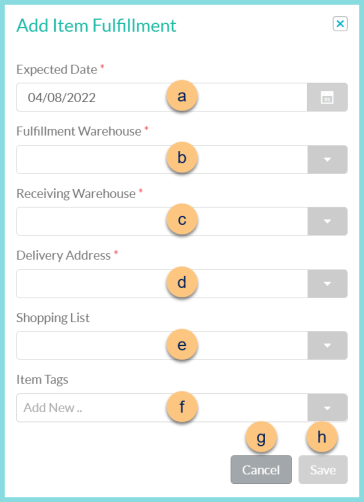
Add or Edit Item Fulfillment
-
Click the Pencil to open an existing item fulfillment
OR -
Click New Item Fulfillment or
(+) > Item Fulfillment to add a fulfillment manually-
Expected Date - choose the anticipated date of delivery
-
Fulfillment Warehouse - choose the warehouse that is sending the product
-
Note: If the user's security role is limited to one building, that building will be selected automatically.
-
Receiving Warehouse - choose the warehouse to which the product is being sent
-
Delivery Address - choose the Receiving Warehouse's delivery address if more than one is available
-
Shopping List - choose a Shopping List to pre-populate the fulfillment with the items on the list
-
Item Tags - choose item tag(s) to pre-populate the fulfillment with items respectively tagged
-
Click Save
-
Individual Item Fulfillment

-
Copy Item Fulfillment - click to create a duplicate copy of the fulfillment
-
Status - notice the fulfillment status
-
Fulfillment Warehouse - notice the fulfillment warehouse
-
Pick List - click to request a pick list report for this fulfillment
-
Expected Date - change the expected date of delivery if needed
-
Identifier - change the fulfillment identifier if needed
-
Receiving Warehouse - notice the receiving warehouse
-
Delivery Address - update the delivery address if needed
-
Reference Number - add a reference number for documentation purposes if needed
-
Identifier - click to sort by item identifier
-
Name - click to sort by item name. Notice the quantity of the base unit of measure per the preferred unit of measure.
-
Requested Quantity - notice the requested quantity and unit of measure from the Warehouse Transfer. If this fulfillment was created manually, enter the requested quantity and unit of measure.
-
Fulfilled Quantity - enter the quantity that will be fulfilled. If the order was created from a Warehouse Transfer, this quantity will populate as the requested amount, and needs to be updated if a different amount will be fulfilled. Note: This quantity will be removed from the inventory of the Fulfillment Warehouse upon posting fulfillment.
Note: If the fulfilled quantity is less than the requested quantity, a new fulfillment will be created if Create Item Fulfillment on Short Fulfillment is selected. -
Quantity Available - click to sort by the current on hand quantity of the fulfillment warehouse
Note: If the Quantity Available is less than the Fulfillment Quantity, a yield symbol will display, and the fulfillment will not be able to be posted. -
Trash Can - click to remove the item from the fulfillment. Note: This indicates that this item will not be fulfilled at all.
-
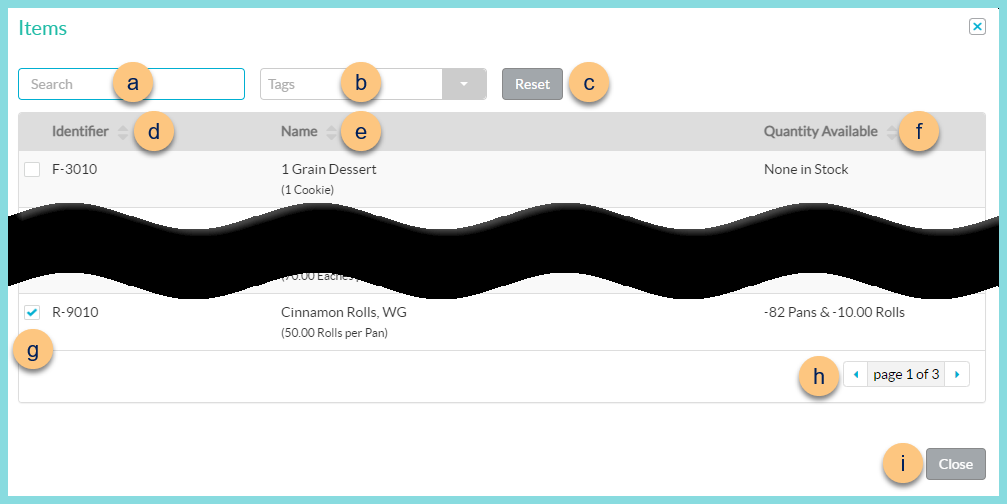
Search Items - search for items or click the Magnifying Glass to add items to the fulfillment
-
Search - search for inventory items that are able to be sent to the receiving warehouse
-
Tags - filter by item tags
-
Reset - click to reset filters
-
Identifier - click to sort by identifier
-
Name - click to sort by name. Notice the quantity of the base unit of measure per the preferred unit of measure.
-
Quantity Available - click to sort by the current on hand quantity of the fulfillment warehouse
-
Checkbox - check to add item to fulfillment
-
< > - click to scroll through pages
-
Close - click to return to the fulfillment and add selected items
-
Notes - add notes if needed
-
Close (orange) - click to permanently close this fulfillment (delete)
-
Close (gray) - click to return to the previous screen without saving changes
-
Save - click to save changes and return to work on it later
-
Post Fulfillment - click to post the fulfillment. This will remove inventory from the fulfillment warehouse and place the inventory on the inventory route of the receiving warehouse. A corresponding item receipt will be created.
Deliver (not pictured, optional) - this option appears after posting fulfillment. Click to deliver the product, which will complete the corresponding item receipt. To document delivery, the receiving warehouse user will sign via mouse or touch screen. Note: This option is not available the first time a warehouse receives a specific item because a storage location cannot be documented.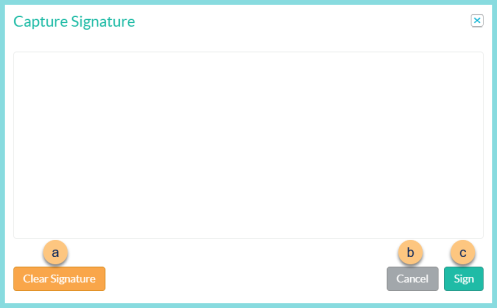
-
Clear Signature - click to clear the signature and re-sign
-
Cancel - click to return to the previous screen without completing delivery
-
Sign - click to capture the signature and post receipt